


Grace Bakes: Buckeye Brownie Cookies

February 6, 2022
Hello again, everybody! I hope that everyone enjoyed reading (and hopefully baking) my Pink Velvet Cookie recipe! I wish I had an update on my party guests’ feedback on the cookies, but, unfortunately, my Sweet 16 got postponed due to COVID. However, it has been rescheduled for April, so I WILL have word by then!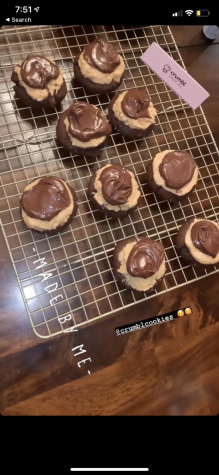
Just in case you didn’t read my last article, (you totally should if you haven’t!), I’m Grace Lorenzo and I am releasing a delicious recipe for a sweet treat to you guys every month. I have enjoyed baking ever since I was young, and have a longstanding tradition with my mom and godmother to bake cookies throughout the year!
This month, I am introducing another Crumbl Cookies copycat recipe! I recently made these buckeye brownie cookies when we were snowed in this weekend, and especially if you are a peanut butter lover, they are to DIE for (well, not actually, but they are SO yummy!). The cookie base is a rich and decadent chocolate cookie, with a sweet-salty peanut butter frosting topped with melted chocolate. It reminded me a lot of a Reese’s Peanut Butter Cup, but with an amazing twist! Even if you have a peanut allergy, you can simply omit the frosting and make a still-delicious double chocolate cookie.
I will say, these cookies are SO good on their own, but if you pop them in the microwave for about 8-10 seconds, so that the chocolate on top can melt again, it makes them taste that much better! Before I get ahead of myself about what to do AFTER you bake the cookies, let’s gather our ingredients and measuring cups/spoons so we can whip them up first.
For the chocolate cookie base, you will need:
- 1/2 cup of softened butter (one stick)
- 3/4 cup of packed brown sugar (you can “pack” it by scooping the brown sugar into the measuring cup with a spoon and pressing down each spoonful!)
- 2 tablespoons of granulated sugar
- 1 egg (at room temperature; let it sit out 30-60 minutes before you start baking!)
- 2 teaspoons of vanilla extract
- 1 1/4 cups of all purpose flour
- 1/2 cup of DUTCH-PROCESSED cocoa powder (while this name sounds very fancy, you can typically find it at your local grocery store! I purchased the brand “Saco” at Shoprite: I would recommend using this kind as opposed to the standard one, since it gives the cookies a great texture and flavor!)
- 1/2 teaspoon of baking soda
- 1/4 teaspoon of salt (ONLY IF you use unsalted butter; if you use salted butter, OMIT salt!)
For the peanut butter frosting (I call it frosting, but it’s a little thicker than frosting; almost like a softer version of fondant!), you will need:
- 1 tablespoon of softened butter
- 1/2 teaspoon of vanilla extract
- 1/2 cup of peanut butter (doesn’t matter what brand!)
- 1/2 cup of powdered sugar
And for the melted chocolate (that is layered on top of the peanut butter frosting), you will need a 1/2 cup of whatever chocolate you’d like! (I prefer semisweet for this recipe, but I’ve also melted milk chocolate Hershey kisses!).
It’s best to separate your cookie base and frosting ingredients so that you do not confuse what you need or the measurements of each ingredient!
I hope you’re ready because, with my help, you are about to taste some of the best cookies you’ve ever had!
- First, preheat your oven to 350 Degrees.
- Line a rectangle baking sheet with parchment paper, and save it for later (this will be used to bake your cookies!).
- For the cookie BASE:
- In a large bowl and using a hand mixer (if you don’t have a hand mixer, that’s fine! A whisk or spatula will work just fine, too, but will just take a bit longer to combine all of the ingredients), cream together the softened butter, granulated sugar, and brown sugar (on low speed) until it has a light and creamy consistency. Make sure to have a spatula handy (when using a hand mixer), since you may need to scrape down the sides of the bowl in the process! I always alternate by going in circular motions around the bowl to mix everything, and then scraping down the sides. Repeat this process until everything is fully mixed (and looks delicious!).
- Add in the room temperature egg and vanilla extract until fully combined (again, with a hand mixer if available, on the lowest speed).
- Mix in the flour, cocoa powder, baking soda, and salt (if needed) until fully combined with the wet ingredients (I folded in these ingredients with a spatula, since it was easier and kept me from making a powdery mess!).
- Now comes the fun part: making the cookie dough balls! The Crumbl Cookies Bakery makes their cookies HUGE, which is something you can totally do! However, for the sake of getting more cookies out of a batch, I usually make mine an average size (like the size of a Chips Ahoy or Oreo Cookie). This part is solely based on your preference!
- Place the cookie dough balls on your baking sheet, and slightly flatten each one (I gently pressed down on each cookie dough ball with the palm of my hand twice, for reference! They will not expand as much as you think, so it’s totally fine to flatten them a good amount).
- Bake for 9-10 minutes, and then let the cookies fully cool on the baking sheet (which takes about 7-10 minutes, depending on the size of your cookies). I usually transfer the cookies onto a cooling rack halfway through this time, but once again, this step is totally optional.
- While patiently waiting for your cookies to set is a perfect time to prepare the frosting!
- For the cookie FROSTING:
- In a medium sized bowl and using a spatula, mix the peanut butter, softened butter, powdered sugar, and vanilla until combined (the mixture will not have the texture of a typical frosting; it is more like a loose play doh consistency if I were to describe it! Not too runny, but not too thick).
- Once fully combined, break the peanut butter mixture into smaller pieces (preferably balls), and place each piece on top of your cooled cookies (flattening each “frosting” ball onto each cookie). Just note to be careful when pressing down on the cookies, as they may still be a little soft and fragile!
- Finally, melt your desired chocolate (in 30 second increments, if using the microwave, taking it out every 30 seconds to stir), and pour on top of each of the cookies.
- Mission accomplished! You just whipped up a decadent, AMAZING cookie. Bon appetit!
My dad and I, especially being Reese’s lovers, very much enjoyed these cookies! The peanut butter frosting truly adds moisture and that extra hint of flavor to the cookie itself, and compliments the semisweet chocolate with a tad of saltiness. Those of my friends who got the chance to taste test also approved!
Again, my number one tip is to heat these cookies up before you eat them! They are delicious at room temperature, but the warm chocolate on top, along with the gooeyness of the cookie and frosting truly make it that much better! I usually heat mine up for 7-10 seconds.
My family and I actually dove into these cookies while we watched the movie “Encanto,” and they were an awesome movie night snack! Not to mention, the movie was amazing, and had so many catchy songs!
Anyways, before I get too off topic, I hope you enjoyed reading and (hopefully) trying out another Crumbl recipe this week! I’m so proud of all of you fellow bakers; make sure to come back next month for another delicious treat!