


Grace Bakes: Pink Velvet Cookies

January 4, 2022
Hello everyone! It has been a WHILE since I’ve written an article, so I’m going to start off by introducing myself. I am Grace Lorenzo, a writer and photographer for the Patriot Press. I did a column last year titled “Rising Stars,” but decided to retire it and am now starting a column called “Grace Bakes”! I have enjoyed baking ever since I was young, and have a great tradition with my mom and godmother to bake Christmas Cookies every year.
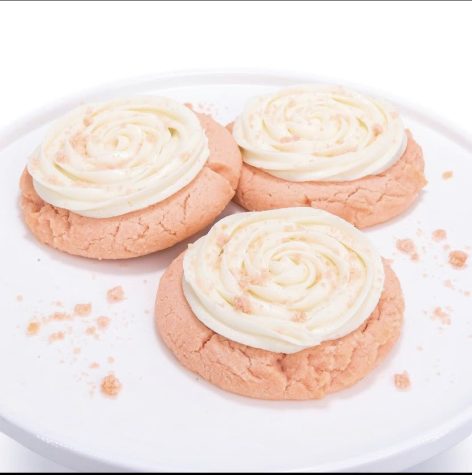
I have yet to bake these cookies for Christmas, though! These cookies are going to be potential party favors for my Sweet Sixteen coming up this January (yes, I am baking homemade cookies for the guests at my party. I’m the best!). These pink velvet cookies have a moist, cakey base that has the best hint of almond flavor. They are topped with a light cream cheese frosting that compliments the cookie so well!
This recipe is actually a copycat recipe from the AMAZING Crumbl Cookies. If you don’t know about this place, you really should! It is a bakery where they release 4-5 gourmet cookie flavors every week for their customers to try, and Pink Velvet was one of the many that they shared! Even if you are not the biggest fan of baking, I will take you step-by-step through this recipe so that even you can make these delicious cookies.
Let’s begin by gathering our ingredients and measuring cups/spoons. For the pink velvet cookie base, you will need:
- 1/2 cup of softened butter (one stick)
- 1/2 cup of granulated sugar
- 1/4 cup of packed brown sugar (you can “pack” it by scooping the brown sugar into the measuring cup with a spoon and pressing down each spoonful!)
- 1 egg (at room temperature)
- 1 teaspoon of vanilla extract
- 1/2 teaspoon of almond extract (this ingredient is a bit uncommon to have in your home already, but can be found at your local grocery store in the baking aisle!)
- 1/4 teaspoon of pink gel food coloring (which you can also find at your local grocery store; I have a pastel kit of gel food coloring that worked great for this recipe!)
- 1 3/4 cups of all purpose flour
- 1 tablespoon of cornstarch
- 1/2 teaspoon of baking soda
- 1/4 teaspoon of salt
And for the frosting, you will need:
- 4 ounces of softened cream cheese (which is equivalent to about a 1/4 cup)
- 6 tablespoons of softened butter (which is about 3/4 of a stick)
- 1/2 teaspoon of vanilla extract
- 1 1/2 cups of powdered sugar
It’s best to separate your cookie base and frosting ingredients so that you do not confuse what you need or the measurements of each ingredient!
Ready? It’s time to dive into the instructions to make these ingredients into a sweet treat!
- -First, preheat your oven to 350 Degrees.
- -Line a rectangle baking sheet with parchment paper, and save it for later (this will be used to bake your cookies!)
For the cookie BASE:
- In a large bowl and using a spatula, mix the softened butter, granulated sugar, and brown sugar together until it is light and creamy (it should appear as a light brown color).
- Add in the egg, vanilla extract, almond extract, and pink food coloring until fully combined (your dough should be nice and pink after mixing!).
- Mix in the flour, cornstarch, baking soda, and salt until fully combined.
- Now comes the fun part: making the cookie dough balls! The Crumbl Cookies Bakery makes their cookies HUGE, which is something you can totally do! However, for the sake of getting more cookies out of a batch, I usually make mine an average size (like the size of a Chips Ahoy or Oreo Cookie). This part is solely based on your preference!
- Once you are done shaping your cookie dough balls, place them on a plate and put them in the freezer for 15 minutes (when you initially shape the cookie dough balls, they will be very soft, so putting them in the freezer will help them to solidify and keep their shape better when baking in the oven).
- Once the cookie dough is done chilling, transfer the balls onto a baking sheet and bake for 12-13 minutes, and then let the cookies fully cool on the baking sheet (which takes about 7-10 minutes). I usually transfer the cookies onto a cooling rack halfway through this time, but once again, this step is totally optional.
- Once cooled, transfer the cookies onto a cooling rack so they can solidify while you make…the FROSTING!
For the cookie FROSTING:
- In a medium bowl and using a spatula, mix the softened butter, softened cream cheese, powdered sugar, and vanilla extract together until the frosting is smooth and creamy (powdered sugar has a naturally lumpy texture, so it is okay for your frosting to have a few lumps! Just make sure most of them are out and that the frosting has a generally smooth consistency).
- If the frosting is too thin to frost the cookies with, you can put it in the fridge/freezer for 10-20 minutes.
- This step has two different options. You can either put the frosting in a ziploc/piping bag and make fancy patterns on top of the cookies, OR you can be simple like me and use a small spatula or knife (any utensil with a flat end, really), and ice the cookies like you would a cupcake. I personally am not very good at using piping bags, so I use the second technique! Whatever works best for you :). Just note to be careful when frosting them so that you don’t break the cookies! Even after cooling they are still very soft.
- And just like that, you are DONE! Admire all of the great work you have done and enjoy your delicious dessert!
I personally LOVED these cookies! My family and friends did, as well. Almond flavoring is not everyone’s cup of tea, though, so you can always omit the almond extract and just use vanilla! You’ll still get the great texture and taste of the cream cheese frosting.
If the color pink isn’t calling your name, you can dye these cookies whatever color you would like! For example, Halloween: orange and black; Christmas: red and green. Whatever your heart desires.
These are the perfect cookies to bake for any occasion (your family and friends will be impressed with your AMAZING baking skills!). Speaking of amazing, I hope that everyone had a wonderful winter break! In your free time make sure to try this recipe and let me know how it went. I will come back next month with a brand new recipe for you guys to try and taste!